
by Raffaele Diodati
The SCPOP release 98 has the capability to customize the sounds available in the stops panel, allowing to load for each stop button a new different sound, that can be an organ sound or a completely different instrument. When we talk about "sound" we mean a sysex file prepared following some special requirements, so that when loaded into the stops table it will work in a way compatible with all the other SCPOP sounds.
The only tool that is now needed to create your new sounds is the shareware Sound Canvas editing software Cedit88, that has inside a special version for SCPOP. If you want to register this wonderful software, ask to the author Constantinos Vlachos or email me.
In this "lecture" I give the SCPOP sounds specifications, and also guidelines for preparing them, following my experience about sound creation, of course focused on pipe organ sounds.
LAYERS
The SCPOP sounds use the layering technique, that is more parts assigned to the same midi channel, so playing at the same time. The standard layers that must be used to produce SCPOP compatible sounds are:
| GREAT ORGAN | parts 1-2-3-4-5-6 | midi channel 1 | ||
| SWELL ORGAN | parts 7-8-9-10-11-12 | midi channel 2 | ||
| PEDAL | parts 13-14-15-16 | midi channel 3 |
A sound using less parts than those available must have the unused parts muted. Muting is obtained by assigning the part parameter Key Range Low to value 127. This has been chosen to maintain the channel assignments also of muted parts; do not mute the parts by assigning them to the "mute" channel! A note for SC-88 and above models users: for SCPOP we use only group A parts, you can forget about group B parts.
TONE MAP
At the moment the SCPOP project still want to be compatible with SC-55 Sound Canvas models. For this reason the patches used for a SCPOP sound must be chosen from the SC-55 Tone Map, including the MT-32 set. This requirement is only for owners of SC-88 and above SC models. Users of SC-55 simply don't care. A new release of SCPOP dedicated to SC-88 is in the mind of SCPOP authors from a long time, and one day it will see the light...
TRANSPOSITION
By default the program reset in SCPOP98 apply a master transposition of +12 keys to the whole Sound Canvas. You need to take care of this remembering that to obtain the "normal" sound from your patch you need to apply a transpose of -12 keys to that part.
TEMPERAMENT
It's not a real requirement: the default temperament both for SCPOP98 and for the normal Sound Canvas patches is the Equal (scale tuning of all parts to 0). It is specified just to let you know that the temperaments available in the program are applied by the program itself.
SYSEX FORMAT
The most important requirement. Each part of the layer must be defined by a sysex, and precisely the bulk dump packet 1 of that part. The whole SCPOP sysex is in this way a sum of single bulk dumps, one for each part composing the layer. This sysex format is easily obtained by using CEDIT88 special edition for SCPOP.
SOUND NAME
It's a requirement only if you want to share your new sounds
with the other SCPOP users. To easily understand from the name if
the sysex refer to a Great Organ sound or to a Swell organ sound
etc.. use this simple code:
G_soundname.SYX for Great Organ sounds
S_soundname.SYX for Swell Organ sounds
P_soundname.SYX for Pedal sounds
Cedit88 save and load two kinds of proprietary files: the .CED Settings files and the .PRT Part Parameter files. You need the registered version otherwise these options will not be available. In .CED files the whole Sound Canvas status is saved, global and part parameters. In .PRT files only the part parameters are saved, in layers ranging from one (single part) to all 16 parts.
We use one fixed file SCPOP98.CED to load the global Sound Canvas parameters, and many .PRT files, for saving and loading the different sounds, one .PRT file for each sound. To effectively understand this explanation you should download a "training package" of files, containing the SCPOP98.CED file and examples of sound file from SCPOP98.
The first step is to load SCPOP98.CED by menu <File>-<Open Settings> . At this point you have set up the master settings for reverb, transpose, equalize etc... You can check this in the Global Parameters window. Once loaded this file you don't need to reload it again for the whole session.
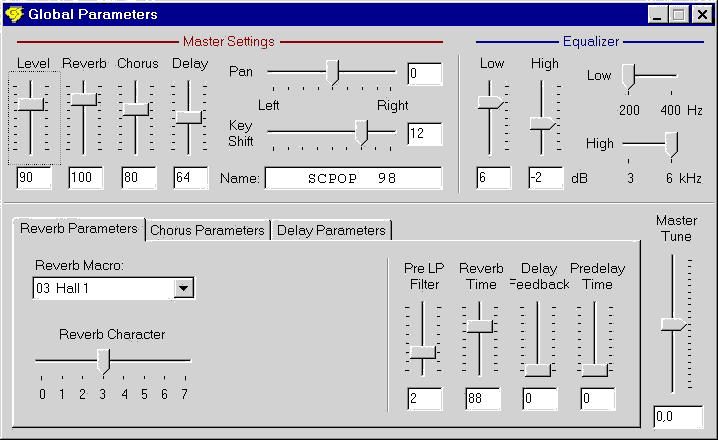
Cedit88 - Global Parameters windows
The second step is to prepare your sound, maybe following the guidelines below and adapting those suggestions to your needs. The sounds can be loaded and saved in .PRT files by the menu <Arrange>-<Import Part Parameters> / <Export Part Parameters>. Remember to save all the parts of a layer.
The third step requires the special Cedit88 version for SCPOP, that you can ask to the author Costas Vlachos when you register his software. To prepare the sysex file,simply use the menu <File>-<Export Settings>. Check only and all the parts composing the standard SCPOP layers (1-6 for Great, 7-12 for Swell, 13-16 for Pedal) and voila' .... the sysex is saved and ready to be imported in the SCPOP Stops Table Editor.
In the following I describe the effect of some Canvas parameters when used to prepare organ sounds. These suggestions are based on my experience but does not want to limit the creativity of new "soundmakers". Not all the Sound Canvas parameters are covered here, but only those where some special value is needed for organ sounds. Every parameter relates to a single part. Since SCPOP sounds are composed of several parts (layers) you need to take care to apply these special values to all of them (except the muted parts). It can be very useful to follow this lecture while having CEDIT88 opened with the example SCPOP sound.
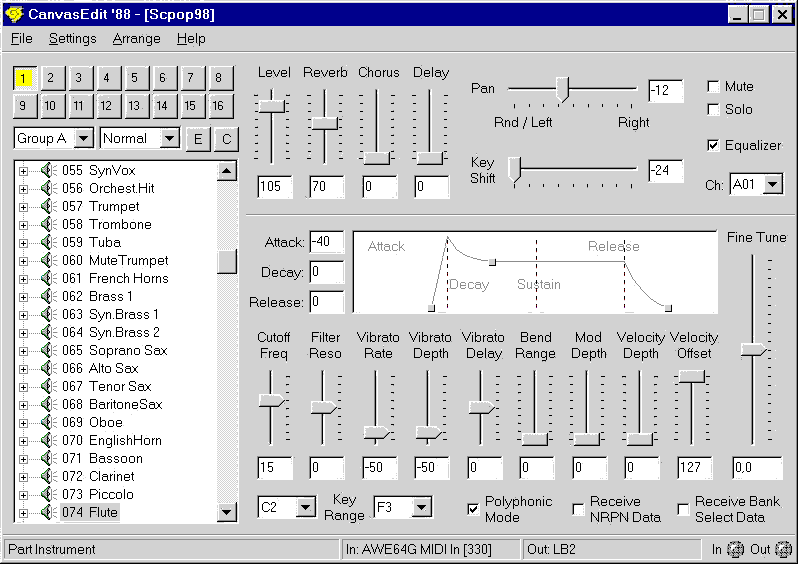
Cedit 88 - main window for Part
Parameters
MIDI CHANNEL
Remember the layering rules stated in SCPOP specifications.
| GREAT ORGAN | parts 1-2-3-4-5-6 | midi channel 1 | ||
| SWELL ORGAN | parts 7-8-9-10-11-12 | midi channel 2 | ||
| PEDAL | parts 13-14-15-16 | midi channel 3 |
A sound using less parts than those available must have the unused parts muted. Muting is obtained by assigning the part parameter Key Range Low to value G9. This has been chosen to maintain the channel assignments also of muted parts; do not mute the parts by assigning to them the "mute" channel!
There is a mute checkbox in Cedit88 upper right of the main panel, useful while studying our layered sound. We could have the need to hear only one or two parts, and mute the others. By temporarily checking that box we temporarily mute the part, while not changing any of is other parameter.
INSTRUMENT
This is the most important choice. I can give these guidelines about which patch to use for which family.
PART TYPE
It is by default in "Normal" mode. If you eventually forget to load SCPOP98.CED you'll find that part 10 is set to drum. In SCPOP part 10 is used for Swell sounds, so set it back to Normal.
LEVEL (Volume)
Each part on a layered sound may have a different volume. It is vital to maintain parts volume's proportions every time. The volume parameter is controlled by controller #7 midi messages, usually sent from our keyboard by the volume pedal, or applied by our sequencer. If we send a controller #7 message to a layered sound, where parts are set up to the same channel, all them would be affected, and at the end all the parts would come up with the same volume level, destroying the volume's proportions. So controller #7 and the volume pedal are dangerous for our layered sounds, and we cannot use it to control the overall loudness of the layer.
The right way is by the controller #11 (expression). By sending an expression controller midi message, for instance of value 64 on channel 1, each part responding on midi channel 1 will have its volume reduced of 64/127, that is around the half of the initial volume. All the parts will maintain their volume's proportions.
To avoid an incidental or ignorant use of the pedal volume you must disable the receive flag of volume message in each part (see below Receive Flags).
PAN
It's the stereo location of the part: the range is -63 to +63. In layered sounds we have two basic choices, plus a trick ..:-)
1) Leaving all the pan at 0 mix very well the timbres, but can
result in a "flat" ambience.
2) Choosing different pan positions for the parts needs
attention: the result is a wide sound if we balance the sharpness
of the parts. In organ for instance if I put a 2' pipe at +30 on
the right, another 2' or 2-2/3' or at most 4' should be put at
around +30 on the left. Otherwise it is too evident while
listening that sharp sounds are only at the right.
A pan position to avoid is -64, that means "random pan". In our classical sounds recreation it has no sense.
The trick is this: set up two parts with the same identical parameters, then split only their pan position putting one at -63, the other at +63. Instead of obtaining a normal mono result, you obtain what is called a "phase interference", hearing a wide sound not precisely localized from left to right. This trick has been used in several of our organ sounds.
As for Volume parameter we must take care that the pan balancing of our sound can not be destroyed by a controller #10 event. This is obtained by disabling the Receive Pan Messages flag in each part (see below Receive Flags).
REVERB
An obvious parameter. Some suggestions : lower sounds get confused with high reverb, while higher sounds gain from that. So for organ sounds the 16' and 8' parts are set up at around the 60 % of the reverb assigned to the highest parts 2' or 1'. The reverb character is most important, but it pertains to all parts and is set up by the SCPOP98.CED fixed file.
CHORUS
Use with much care and only a very small amount! Only when it is not possible (due to limited parts available) to get a more realistic chorus effect by detuning the pitch of two identical parts, make them beating like in real organ "pipe to pipe".
KEY SHIFT
Most important! It transposes the part in a range of 4 octaves (-24, +24). It is complicated by the Master Transposition of +12 we have applied to the whole Sound Canvas. At the end the correspondence between key shift and stop height is:
transpose of -24 produce a stop of 16'
transpose of -12 produce a stop of 8'
transpose of -5 produce a stop of 5-1/3'
transpose of 0 produce a stop of 4'
transpose of +7 produce a stop of 2-2/3'
transpose of +12 produce a stop of 2'
transpose of +16 produce a stop of 1-1/5'
transpose of +19 produce a stop of 1-1/3'
transpose of +24 produce a stop of 1'
FINE TUNE
It increase/decrease a small amount the tuning of the part. Why do we need to detune single parts ? Because this is the real world ! There is no chance that all ranks of real organs are perfectly tuned one another. By detuning one of two parts of 4' you obtain a beating/chorusing effect that is a lot more realistic that the chorus parameter. The best range for detuning is from 8' to 2'. The 16' shows less effect, while the 1' shows too much effect.
Another use of the detuning is in stops where real organ builder used it to obtain particular stops : the Cornetto for example has two fifths detuned in opposite way from the right frequency. The Vox Umana is produced by detuning two Principal pipes and let them beating one the other.
KEY RANGE LOW & HIGH
It's the keyboard extension, ranging from C1 to G9. The organ extension to apply is : key low C3, key high C8. The parts not used in layers must be muted by applying its key low range at G9.
Another use of these parameters is in "splits". It can happens that different note ranges (inside the overall keyboard range) need different part settings to get more realistic. For example in the included stop Fondi 16-4 we have assigned different volumes in two separate ranges to the same patch Flute of 16'. Of course particular attention need to be done at the splitting note, that must do a smooth transition. This "splitting" is very part consuming, but can reach good results.
VIBRATO RATE, DEPTH, DELAY
These parameters apply a periodical (sinusoidal) shift in frequency of the tuning. Many patches (flute, strings) have a built-in vibrato setting, but we do not want this effect on organ sound (we don't want continuously modulating pipes!) and we must subtract it by these settings. So every part in SCPOP has to be detracted of its built-in vibrato setting. Apply this to every part just to standardize, don't care if one need it and one don't.
VELOCITY DEPTH & OFFSET
These parameters are important but easy to set up. Organ do not have any sensitivity to the pressure of the finger on the keyboard. So we must choose a velocity depth of 0. On the other way the default velocity offset of 64 is too low. As a starting point choose always 100 for the offset.
The velocity affects also various envelopes settings (attack, cutoff etc...) of the sound, especially for the reeds and strings. So the velocity offset can be used to vary the part sound.
CUTOFF FREQUENCY
It is a sort of "treble" knob. In pipe instruments raising the cutoff increase the blowing, lowering it reduces some of the harmonics that gives an "electronic" sound. Its effect can be useful depending from the instrument.
FILTER RESONANCE
This parameter affects only the highest frequencies of the instrument sound, and at the same time introducing a feedback on those frequencies. It can be used to increase harmonics, usually in combinations like Ripieni. On single stops reducing it can cut the more "electronic" part of the sound.
ATTACK, DECAY, RELEASE
These parameters alter the sound in the greater way.
Attack is the first part of the sound, from silence to the time that the sound reaches its peak. Reducing the attack is useful, and necessary, to have a quick pipe sound raising, especially with low stops (key shift lower/equal -12) . Excessive reduction (more then -10/-20) can result in "bumps" for some patches. Increasing the attack (not more then 2-5) make a smoother sound startup, necessary especially together with key shift higher then +12. A special features of reeds: they need to reduce the attack time at most (-50) to eliminate the first part of the sound envelope (not real for pipe organs) and to remain only with the decay/sustained part (more stable, realistic for continuously blowed pipes).
The decay is a timeframe not always present in instruments' sounds : only complex sounds have this feature, like the reeds. Increasing the decay in the reeds (all the way +50) makes smoother the transition to the sustained part, which is the more interesting for pipe organs.
The sustained part of the sound is not adjustable in Sound Canvas.
The release is how the instrument sounds after releasing the key, or (gradually) stop the breath. Usually increasing the release a small amount (2-5) make a smoother transition to silence, but too much increasing make the note too long and confuse with the subsequent notes.
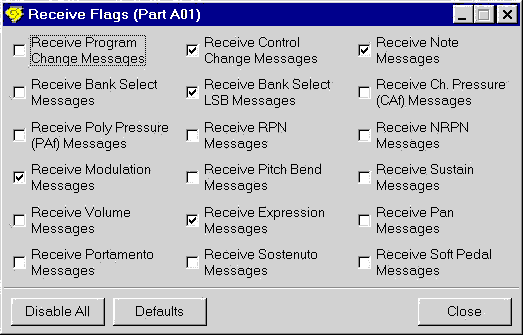
Cedit88 - Receive Flags window
RECEIVE FLAGS
These check parameters makes able/unable the Sound Canvas to receiving that particular midi messages. In SCPOP sounds you have to uncheck (disable) everything except :
All other receive flags must be unchecked (disable), in particular
The other flags are unchecked just for "protection" : it's better do not leave freedom to users to alter the organ sounds by the pitch bend like a guitar, or to use the sustain pedal like in piano! So I suggest to disable everything that is not needed for organ instrument.
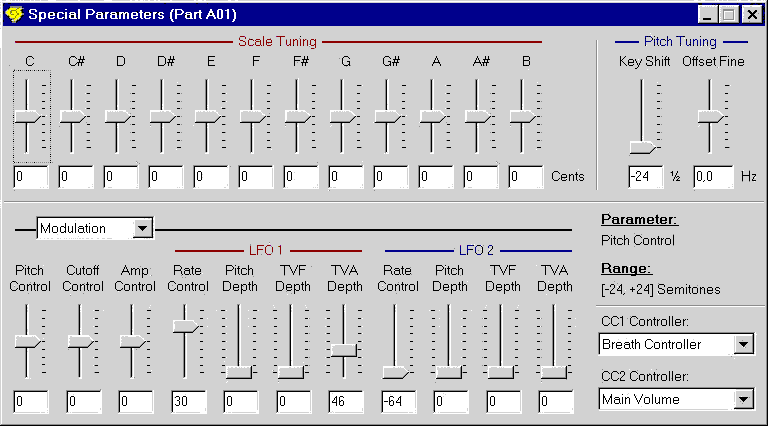
Cedit88 - Special Parameters window
SCALE TUNING
The most I know on scale tuning I learnt from the wonderful paper of Chas Stoddard on "Microtonality and Temperaments in Sound Canvas". In the early SCPOP releases we applied by default the Silbermann temperament, because using a NOT equally tempered scale (that is all the notes in scale tuning window flat at 0) produces better organ sounds. Now in SCPOP 98 the temperament is applied directly by the program and don't need to be "hardware" inserted into the parts. So leave the scale tuning to their default 0 values.
I hope these
notes will incite you in the fascinating activity of
"soundmaker"!
Any comment and suggestion is welcome: write to Raffaele
Diodati.